

How To Shoot Video On Cannon Camera Straight To Computer
Solution
Notes nearly movie shooting
Y'all tin can operate your camera remotely from EOS Utility and shoot movies from the screen of EOS Utility.
Of import
- The captured movie file is saved on the camera's memory card. Therefore, to employ the captured moving-picture show on a PC, it is necessary to download the captured motion picture file to your computer. Please come across the related information for how to download.
- Y'all cannot operate the photographic camera when the [Remote Live View window] is displayed. When the <
 > (Alive View Shooting) push is pressed, the Live View image volition also display on the camera'due south LCD monitor, allowing you to view the image while controlling the camera.
Shooting Movies (Focusing Manually)
ane. Connect your photographic camera and computer, and then turn the camera'south power switch to < ON >.
Please run across the related information for how to connect the camera to the calculator.
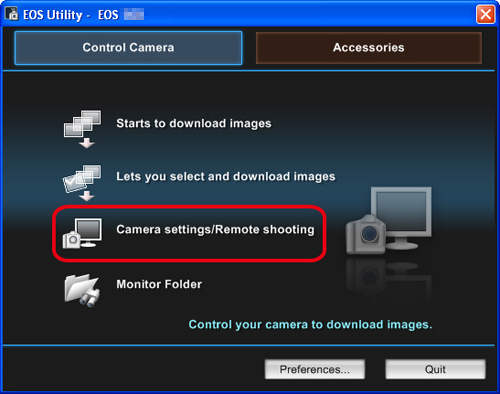
2. When EOS Utility starts, click [Camera settings/Remote shooting].
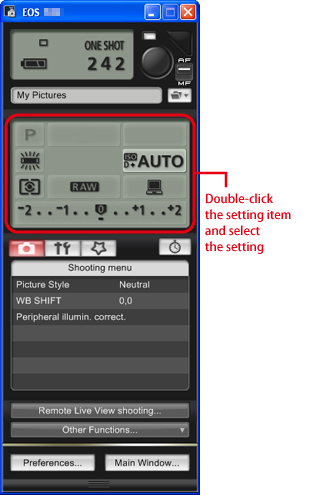
iii. When the capture window appears, set the settings items for shooting.
4.Gear up the Alive View role.
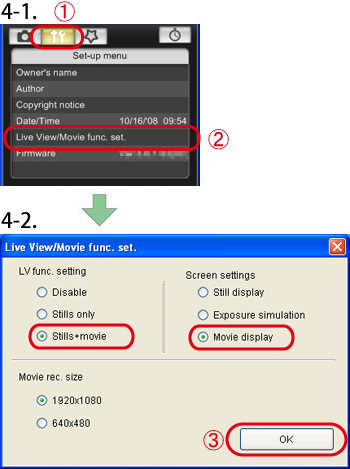
4-one. Click  to display the [Function Setting Card], and click [Alive View/Film func. set.] (
  ).
).
4-2. The [Alive View/Movie func. set up.] window appears, so select [Stills+motion picture] in the LV func. Setting, [Picture show display] in the screen settings, set the motion-picture show recording size, and then click [OK](  ).
).
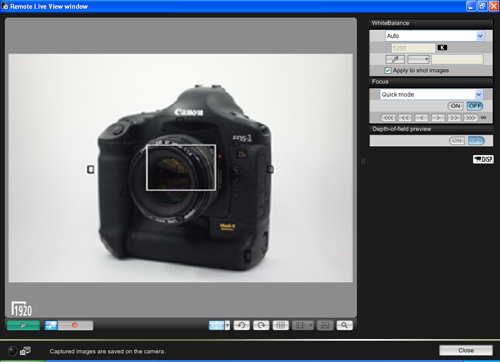
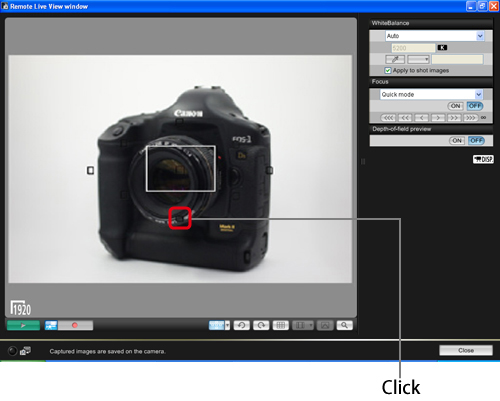
5. The [Remote Live View window] appears, and so cheque the shooting paradigm.
Notation
If the [Remote Live View window] does not announced, click the [Remote Alive View shooting].
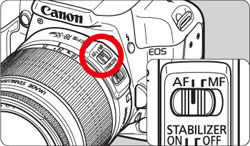
6. When focusing using AF (autofocus), gear up the lens focus style switch to <AF>.
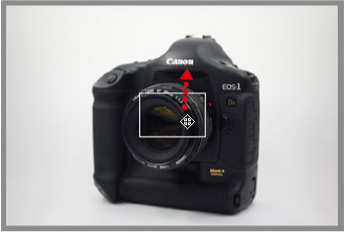
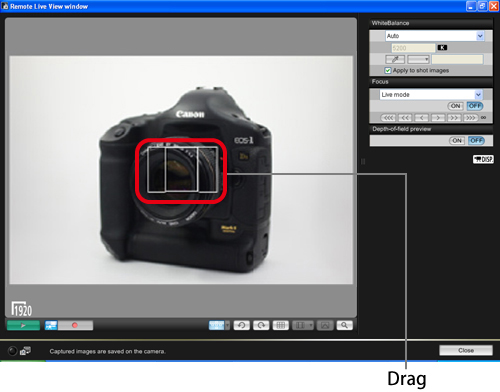
seven. Because the mouse cursor will change in shape every bit follows if it is moved to the inside of the rectangular frame on the screen, drag the enlargement brandish frame to move it to the position where you want to focus.
8. Click [  ] in the lower center of the window to display the enlargement window.
The section you selected in step 8 is displayed enlarged at 100% (actual pixel size)
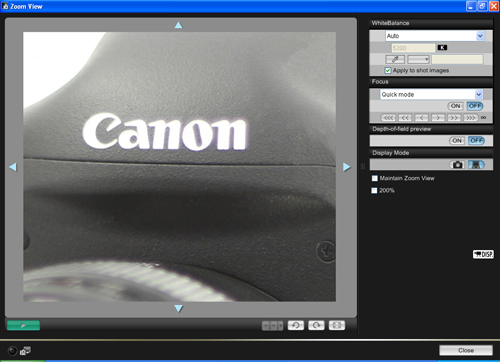
To motion the display position in the [Zoom View] window, click either [  ], [
], [  ], [
], [  ], or [
  ].
].
Double-click an paradigm in the [Zoom View] window to return to the [Remote Alive View window].
9. Click the [Focus] buttons to bring the paradigm into focus.
The [Remote Alive View window] changes in real time according to the focus position aligning.
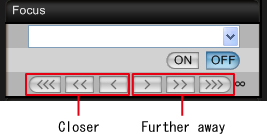
Focusing Adjustment Amount
10. When focus is achieved and the camera is ready for shooting, click the [  ] button on the lower left of the [Remote Live View window].

xi. Click the (  ) push button to kickoff shooting.
At the lower left of the [Remote Alive View window], a [  ] icon and the recording time are displayed.
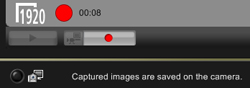
Click the [ ] button once again to end shooting.
NOTE
In Remote Live View shooting, if yous do non click the [ ] push button when operating the camera to shoot movies, shooting cannot be carried out.
Shooting Movies (Focusing Using AF)
In Quick, Live and Alive confront detection AF modes, images can be focused automatically in the same style equally with the camera itself.
To focus automatically, follow steps 1 to 8 of "Remote Live View Shooting (Focusing Manually)", and set each AF mode.
Focusing Using Quick Mode
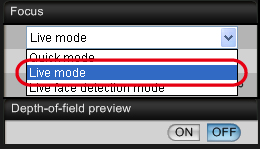
9. Select [Quick fashion] from the [Focus] list box.
The AF points announced.

x. Click the AF betoken in the position where you want to focus.
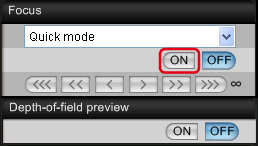
11. Click [ON].
- AF is executed.
- When focus is achieved, the camera makes a beeping sound, image will reappear in the Remote Live View window and the AF indicate turns red.
- To cancel AF functioning, click the [OFF] button.
12. When focus is achieved and information technology becomes ready for shooting, click the [ ] button at the lower left of the [Remote Alive View window].

thirteen. Click the [ ] push button to start shooting.
At the lower left of the [Remote Live View window], a [ ] icon and the recording time are displayed.

Click the [ ] button again to end shooting.
ix. Select [Live way] from the [Focus] listing box.
The AF points appear.
ten. Drag the enlargement brandish frame to move it to the position where you want to focus.
eleven. Click the [ON] button.
- AF is executed.
- When focus is achieved, the camera makes a beeping sound and the AF point turns green.
- If focus is non achieved, the AF signal will plow red.

12. When focus is accomplished and the camera is gear up for shooting, click the [ ] push at the lower left of the [Remote Live View window].

13. Click the ( ) button to start shooting.
At the lower left of the [Remote Alive View window], a [ ] icon and the recording time are displayed.

Click the [ ] button once more to finish shooting.
Focusing Using Live Face Detection Style
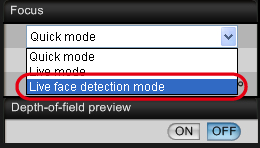
nine. Select [Live face detection mode] from the [Focus] list box.
- When a face is detected, an AF point appears.
- When there is a face other than the face detected by the camera, a new AF point appears when you move the cursor to the position of the other face. Clicking that position selects the AF betoken.
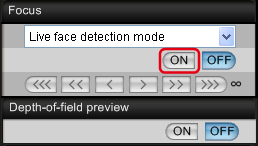
10. Click the [ON] button.
- AF is executed.
- When focus is accomplished, the camera makes a beeping sound and the AF bespeak turns greenish.
- If focus is non achieved, the AF point volition turn crimson.
- If a face cannot be detected, the AF signal will exist fixed to the center for focusing.
11. When focus is achieved and it becomes fix for shooting, click the [ ] push at the lower left of the [Remote Live View window].

12. Click the [ ] button to start shooting.
At the lower left of the [Remote Live View window], a [ ] icon and the recording fourth dimension are displayed.

Click the [ ] button again to stop shooting.
Explanations for the Remote Alive View shooting operation method are complete.
Source: https://sg.canon/en/support/8200359900
Posted by: shawpuble1956.blogspot.com
0 Response to "How To Shoot Video On Cannon Camera Straight To Computer"
Post a Comment